| Click
here to visit the official website of the American Brittany Club |
 |
 |
|||||||||||||||||||||||||||||||||||||||||
A guide to grooming Brittanys for show, field & home by Jessica Carlson
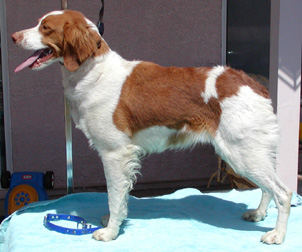
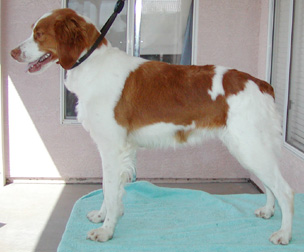
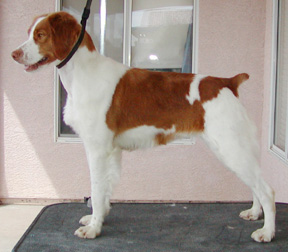
There are many variations of coat type in Brittanys. As examples are available, ways to deal with different coat types will be addressed here. The Brittany shown below will be used for several examples, as she represents an average coat type and good structure (thus no special "tricks" are used to mask obvious faults). This dog was ungroomed for 3 months prior to these photos being taken.
BATHING YOUR DOG Whether or not your dog has been bathed recently, start every major grooming session with a bath. Dirty dogs cause undue wear on your grooming tools, and a dirty coat has a different texture than a clean one. Use a good conditioning or whitening dog shampoo, and make sure you shampoo and scrub every part of the dog.
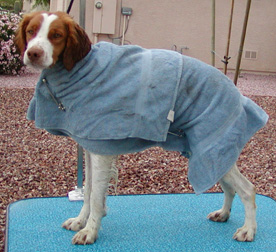
Wavy, thick, and unruly coats may do best force-dried and/or toweled. To towel, pin a towel over the dog's back (see photo at right) and crate the dog overnight. This technique can be used for any coat type, to help the coat dry straight and flat. Find a thin towel, folded to the length of the dog from the back of the skull to the tip of the tail. After bathing, comb or brush the dog's coat as straight as possible, then place the towel over its back. Use horse blanket pins or extra-large quilting pins to secure the towel at the neck and under the belly, just in front of the back legs. Do not attempt this with any smaller safety pins, as they will break open when the dog is crated.
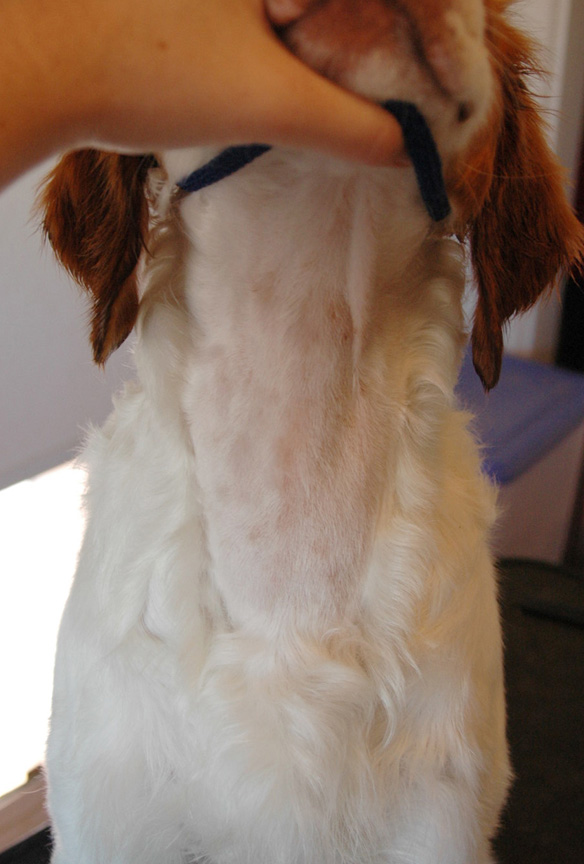
In this step you can remove the bulk of the hair from the neck and ears. On most dogs, cleaning up the neck makes the biggest change in the overall outline and appearance. If your dog has not been exposed to clippers, first place him on the table with the noose secured, turn the clippers on a few feet from him and speak in a low, calm voice as you bring them closer. If the dog is bothered by the noise, take a minute or two to get him used to the noise and feel of them before you try to use the clippers on the neck. When he is calm, you will grasp the muzzle and lift it up until the neck is fairly straight (not curved toward you). Using a #10 blade, you will go downwards (with the grain) if your show is in two weeks or less; more than that, you can go against the grain and allow 2-3 weeks for the hair to grow back in some. Clipper from the jaw line down to about 2 fingers above the breast bone. The exact spot will vary, but look at your dog from the side and imagine an angle from the top of the dog's shoulder blades to the breast bone. There should be an inch or less of hair above that line on the front of the dog's neck. You are shaving approximately a U-shaped pattern between the ridges where the hair changes direction on either side of the dog's neck. Feel for a depression on either side and slightly above the dog's breast bone; you should clipper just into this depression as your lowest point (but it is best to make an upside down "V" by leaving some hair above the breast bone). The photo at right shows the dog's neck just after clippering is finished. Next, lift the dog's ear forward and hold it against the muzzle,comb the hair from behind the ear and down along the ridge that is left at the side of the neck. You can scissor off all the long hair from these areas, as you will be blending the short shaven hair into the longer hair on the sides & back of the neck (this can be done entirely with thinning shears, but it will take you much longer). Be careful not to cut hair from the tops of the ears, but do clean out the hair from behind and under the ears. Lift the tail and use scissors to cut the long hair off the end and underneath the tail, all the way to the base. You may also comb the hair under the tail against the grain to make it stand out from the body, and trim it all the way down. This can be a rough cut since the rest will be done with thinning shears later. If your dog has a lot of feathering under the tail (in a triangular area between the two bones that are the "point of rump" and the tail), this can be combed out and scissored off to minimize what you will need to do with thinning shears later, as well. VARIATION FOR FIELD/HOME GROOMING TRIMMING NAILS Nail trimming can be done with nail clippers and/or with a Dremel-type rotary tool, which grinds down the tail with sandpaper. I use both, first clipping back the nails and then dremeling to finish. If your dog has a lot of hair on its feet, cut some of that back before using a Dremel, so it doesn't get caught and torn out. Cut and/or grind away all of the clear part at the end of the nail (top, bottom and edges around the "quick", the pink nerve inside). If you use nail clippers, it's a good idea to keep some syptic powder or "Quick Stop" to stop bleeding in case you hit the quick and cause the nail to bleed. If you use a Dremel or similar tool to grind the nails, keep in mind that friction causes heat, and you will cause your dog great discomfort if you keep the sander in any one place for more than a few seconds at a time. It is best to grind for a couple of seconds, stop for a couple seconds, and so on if you have to spend much time on any one nail.
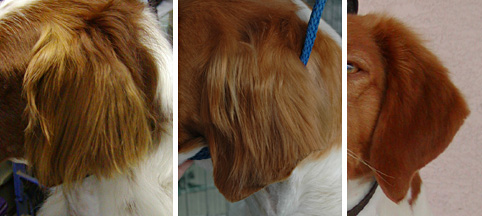
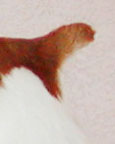
EARS Different dogs grow featherings on the ears differently, but they should all end up looking the same. If your dog has long hair all over its ears, even towards the tips, you will need to perfect your work with combing and using thinning shears to shorten the hair to a "normal" length. The Brittany standard states that ears should carry little fringe.
The photos above are three different dogs' ears. The first (left) is ungroomed, and typical of what many Brittanys will grow on their ears. Comb and cut the featherings even with the ear leather as described above. The second (middle) photo shows how the ear should look after this is done. The third (right) photo is a finished ear -- note that this dog does not grow a lot of feathering on the ear, so not a lot of thinning was needed as would be done on the first two dogs, to shorten the hair overall, but all ears should have this appearance in the end, with feathering about an inch long at the top of the ear, shortening towards the tip. After you have cut the ear featherings even with the ear on the outer edge and tip, you will need to shorten any long featherings (as shown in the middle photo above). This is done with thinning shears. Comb the featherings upwards so they stand away from the ear, and trim with the thinning shears so that featherings are shortest near the tip and outer edge of the ear, and about 1/2 to 1 inch long at the top of the ear. Take care not to cut the featherings too much where the ear meets the skull, as you will detract from your dog's expression. Getting the right look on the ear may take some practice, so don't be afraid to experiment in between shows. The finished effect should be similar to the third photo above. FEET
The same basic process is repeated on the rear feet, although you will not
be able to lift them the same as you do the front feet, so you will do most
of the cleaning from between the toes while the dog is standing with its feet
on the table. TAIL & REAR
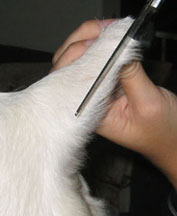
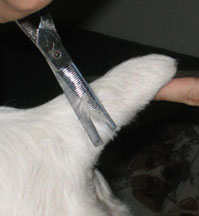
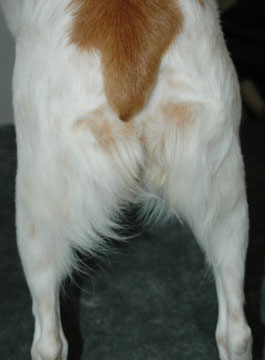
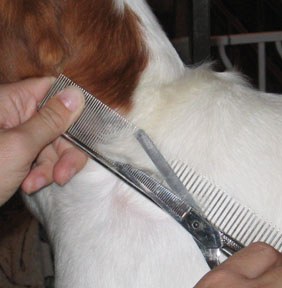
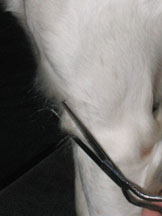
Next you will spend some time neatening the hair all around the tail using thinning shears. Start as shown at right, using thinning shears to trim with the grain of the hair to clean up the sides of the tail. This can also be done on top of the tail towards the tip, but be careful not to cut hair on the top side near the root of the tail, as you can easily make your dog's tailset look terrible! If there are a lot of stray hairs in that area that fold up when the dog puts its tail up, you can carefully trim some of those, but only as much as absolutely necessary. If your dog has a very short tail as shown above, you may wish to trim more on both sides of the tail at the base, against the grain, giving as much definition as possible to the end of the body and beginning of the tail. You will also need to clean out the hair from below the tail, down to the points of rump (two bones protruding under and to each side of the tail). There are often cowlicks over each bone. The area between the base of the tail and the two points will form a triangle where you may scissor first if there is a lot of feathering to get through, but then use thinning shears to trim neatly and achieve the final result shown below. This is also a good time to trim up featherings on the rear legs as needed. The AKC standard states the dog should have "featherings halfway to the hocks". If your dog has much more or much longer featherings than what's shown below, you can carefully use thinning shears to trim up as needed. Use care to keep a natural appearance and not make any obvious straight lines in the featherings. Many dogs have some longer, often fuzzy hair just above the hocks. Use thinning shears with the grain of the hair to trim this off entirely.
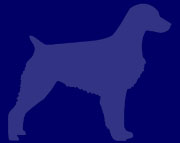
NECK This is usually the most challenging and time-consuming part of the grooming session. If you're fortunate enough to have a dog with a straight, flat coat, things will go a little easier for you, but since Brittanys are allowed wavy coats as well and those usually also have more texture to their hair, some dogs take longer to achieve the desired result. Below are two photos of dogs with different coat types, with the area shaded in red showing where you will be trimming hair to neaten the neck. This is basically from behind the ear, down the side of the neck to a hollow spot just above and to the side of the dog's breastbone. From there you will work out and down a bit, then move in a line upwards following the dog's shoulder blade, and back up towards the head again. DO NOT shave, trim, or scissor hair from the back of the neck unless absolutely necessary! Doing so will give a false indication of poor onset of neck to shoulders on most dogs. If the dog's hair on the back of its neck is very long or out of control and you must trim it, do so at least 2 weeks before a show, so the hair can grow back out some and have a natural appearance.
This process will take a lot of time and practice to master. You may wish to work on dogs you're not planning to show, watch how the coat grows out in a week or two, and then try it on your show prospect/s. Remember there are many different coat types and textures, so you will also have to adjust your technique to fit each individual dog. VARIATION FOR FIELD/HOME GROOMING If your dog has a lot of thick and/or wavy hair on the sides of its neck, you could use clippers (either with a comb attachment, or held slightly away from the dog's body) to cut down some of the long hair on the side of the neck. But please note, this will not give the neat & finished result the method above will, and is absolutely not an acceptable method for grooming a Brittany for the show ring. FINISHING TOUCHES Your dog is just about ready to show! Now you will want to step back and take a look at the overall picture, clean up any stray hairs that detract from the dog's true outline.
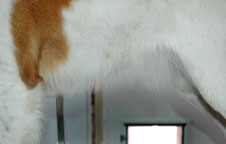
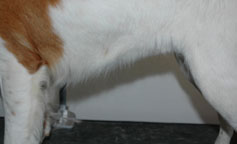
Some dogs have quite a bit of longer hair under their belly, which you may wish to clean up a bit using thinning shears. Use extreme care when doing this, and practice if possible to see what different uses of the thinning shears will do. The dog should NOT appear scissored or "carved", which is sometimes easy to do when using scissors or just cutting off the tips of the hair. See photos below.
If your dog has long featherings on its front legs and underneath, you may wish to trim these down as well. The featherings on the front legs should not be more than 2-4 inches in length (depending on your dog's coat overall). If your dog's are longer, they are very likely to fly around and detract from its movement going away from and back to the judge. To trim, comb carefully and use one hand to hold them straight out from the leg, then trim evenly with thinning shears. Again do not use scissors as this will leave a harsh line. Trim hairs closer as you near the pastern, and taper at the bottom inch or two to, ending up with hair no more than an inch long at the bottom. When combed back down, the leg featherings should not hang below the rear pad into the area of the pastern. The underside featherings should not hang more than an inch or two below the elbow. If your dog's are quite long, trim with thinning shears at least a week before any show. This hair is extremely easy to leave a sharp line in, so take extreme care. Comb the coat down with the grain, and allow it to hang naturally as you make small cuts with your thinning shears.
Many dogs have markings that come across their toplines and cause optical illusions that may not be desirable. Check your dog from the same angle a judge would, and if necessary use thinning shears to trim down hairs that may make it look like your dog has a "hole" in its topline. Finally, you may wish to have someone videotape while you handle your dog as you would in the show ring, and/or have someone else handle your dog while you watch, to see how the dog appears in motion, in case you need to make any final adjustments. Best of luck! This page may be updated in the future; please check back. |
|||||||||||||||||||||||||||||||||||||||||
 Dogs with
very straight, flat coats may be crated and/or left to air-dry. Optionally,
you may use a force dryer and comb/brush to help dry the coat quickly and give
a finished appearance to the coat.
Dogs with
very straight, flat coats may be crated and/or left to air-dry. Optionally,
you may use a force dryer and comb/brush to help dry the coat quickly and give
a finished appearance to the coat.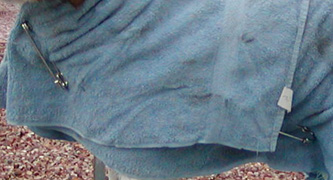

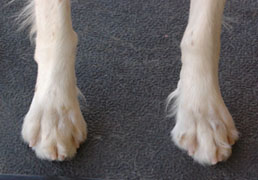
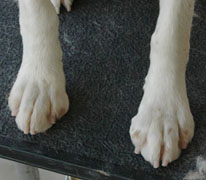
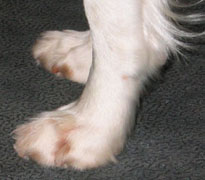
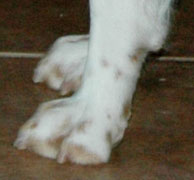
 Picking
the foot up, first scissor all the hair from the underside of the foot, even
with the leathers of the pads. Comb the hair on the back of the pastern against
the grain and cut fairly short, about 1/2 inch or less. Make sure to trim off
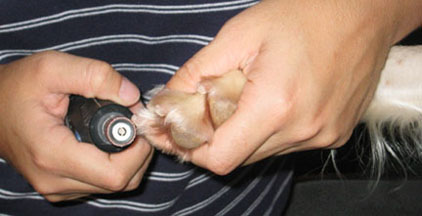
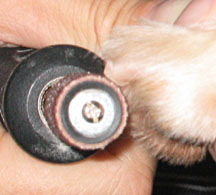
long hairs coming out of the dewclaw area. Then, holding the foot as shown at
right, use thinning shears to trim down hair from between the dog's toes. You
may gently pull hair up as needed to trim it neatly, but do not reach between
toes to "clean out" all the hair between them, especially if your
dog does not have very close toes (tight feet). Once this is done, place the
foot back on the table and trim stray hairs as needed to achieve the look of
the "after" photos above.
Picking
the foot up, first scissor all the hair from the underside of the foot, even
with the leathers of the pads. Comb the hair on the back of the pastern against
the grain and cut fairly short, about 1/2 inch or less. Make sure to trim off
long hairs coming out of the dewclaw area. Then, holding the foot as shown at
right, use thinning shears to trim down hair from between the dog's toes. You
may gently pull hair up as needed to trim it neatly, but do not reach between
toes to "clean out" all the hair between them, especially if your
dog does not have very close toes (tight feet). Once this is done, place the
foot back on the table and trim stray hairs as needed to achieve the look of
the "after" photos above. 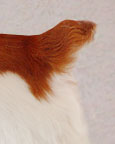
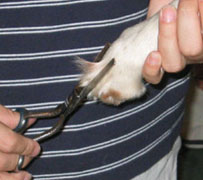
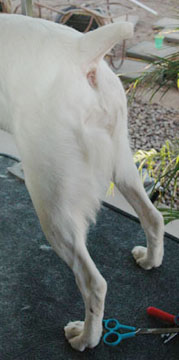
 Every
Brittany's tail looks better trimmed up! To start, first cut any hair off the
very tip of the tail, then comb hair on the underside of the tail against the
grain (from tip to root), and scissor it cleanly off, even with the underside
of the tail, using scissors as shown at left. This will remove most of the extra
featherings.
Every
Brittany's tail looks better trimmed up! To start, first cut any hair off the
very tip of the tail, then comb hair on the underside of the tail against the
grain (from tip to root), and scissor it cleanly off, even with the underside
of the tail, using scissors as shown at left. This will remove most of the extra
featherings.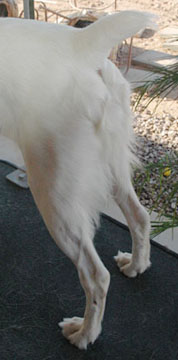
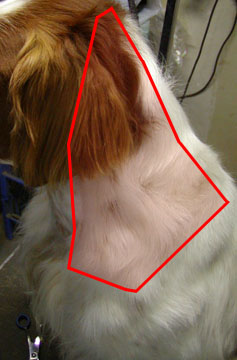

 The
areas outlined in red above show where you will be trimming hair off the neck.
Begin by holding the dog's ear forward, and use thinning shears and/or scissors
to cut the long hair from behind and under the base of the ear, then down along
the ridge of hair on the side of the neck (you've previously clippered up to
this ridge). You are finished with the scissors at this point, now use a comb
and thinning shears as shown at right to shorten the hair and blend the shorter
hair on the front of the neck into the longer hair at the back of the neck.
Lift the hair with the comb, and combing against the grain, trim with thinning
shears to shorten the length of the hair. Continue this in the areas outlined
in red above, until the hair is well blended. Be sure to keep the comb moving;
this will allow the best blending and not make "holes" in the coat.
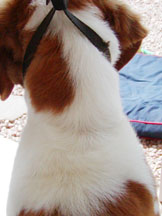
Once you have blended this area well, you may comb it down and take a look from
behind the dog (see below). The hair should lay neatly with the outline of the
dog's body, but if not, you may use the thinning shears a bit with the grain of the hair to trim off any stray hairs that remain.
The
areas outlined in red above show where you will be trimming hair off the neck.
Begin by holding the dog's ear forward, and use thinning shears and/or scissors
to cut the long hair from behind and under the base of the ear, then down along
the ridge of hair on the side of the neck (you've previously clippered up to
this ridge). You are finished with the scissors at this point, now use a comb
and thinning shears as shown at right to shorten the hair and blend the shorter
hair on the front of the neck into the longer hair at the back of the neck.
Lift the hair with the comb, and combing against the grain, trim with thinning
shears to shorten the length of the hair. Continue this in the areas outlined
in red above, until the hair is well blended. Be sure to keep the comb moving;
this will allow the best blending and not make "holes" in the coat.
Once you have blended this area well, you may comb it down and take a look from
behind the dog (see below). The hair should lay neatly with the outline of the
dog's body, but if not, you may use the thinning shears a bit with the grain of the hair to trim off any stray hairs that remain.
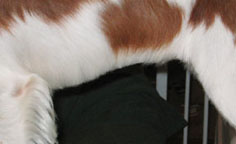
 Most
dogs have some hair sticking out at the bottom of the upper arm (where the front
legs meet the body). This can also be trimmed with thinning shears, to show
the dog's front angulation. See photo at right.
Most
dogs have some hair sticking out at the bottom of the upper arm (where the front
legs meet the body). This can also be trimmed with thinning shears, to show
the dog's front angulation. See photo at right.